-
- (Win OS) - Set up the wired network connection for PS1020W / MFP1608W Print server
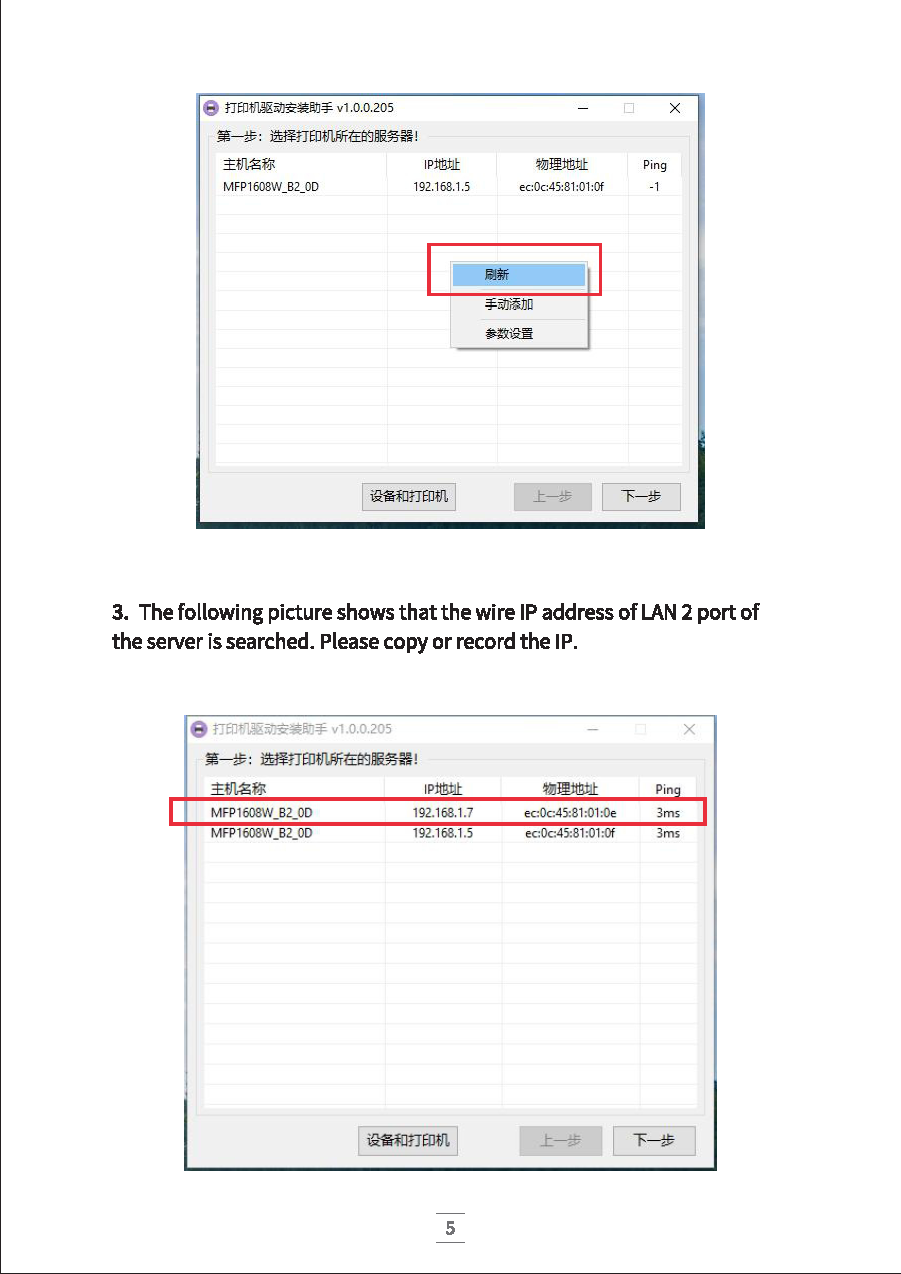
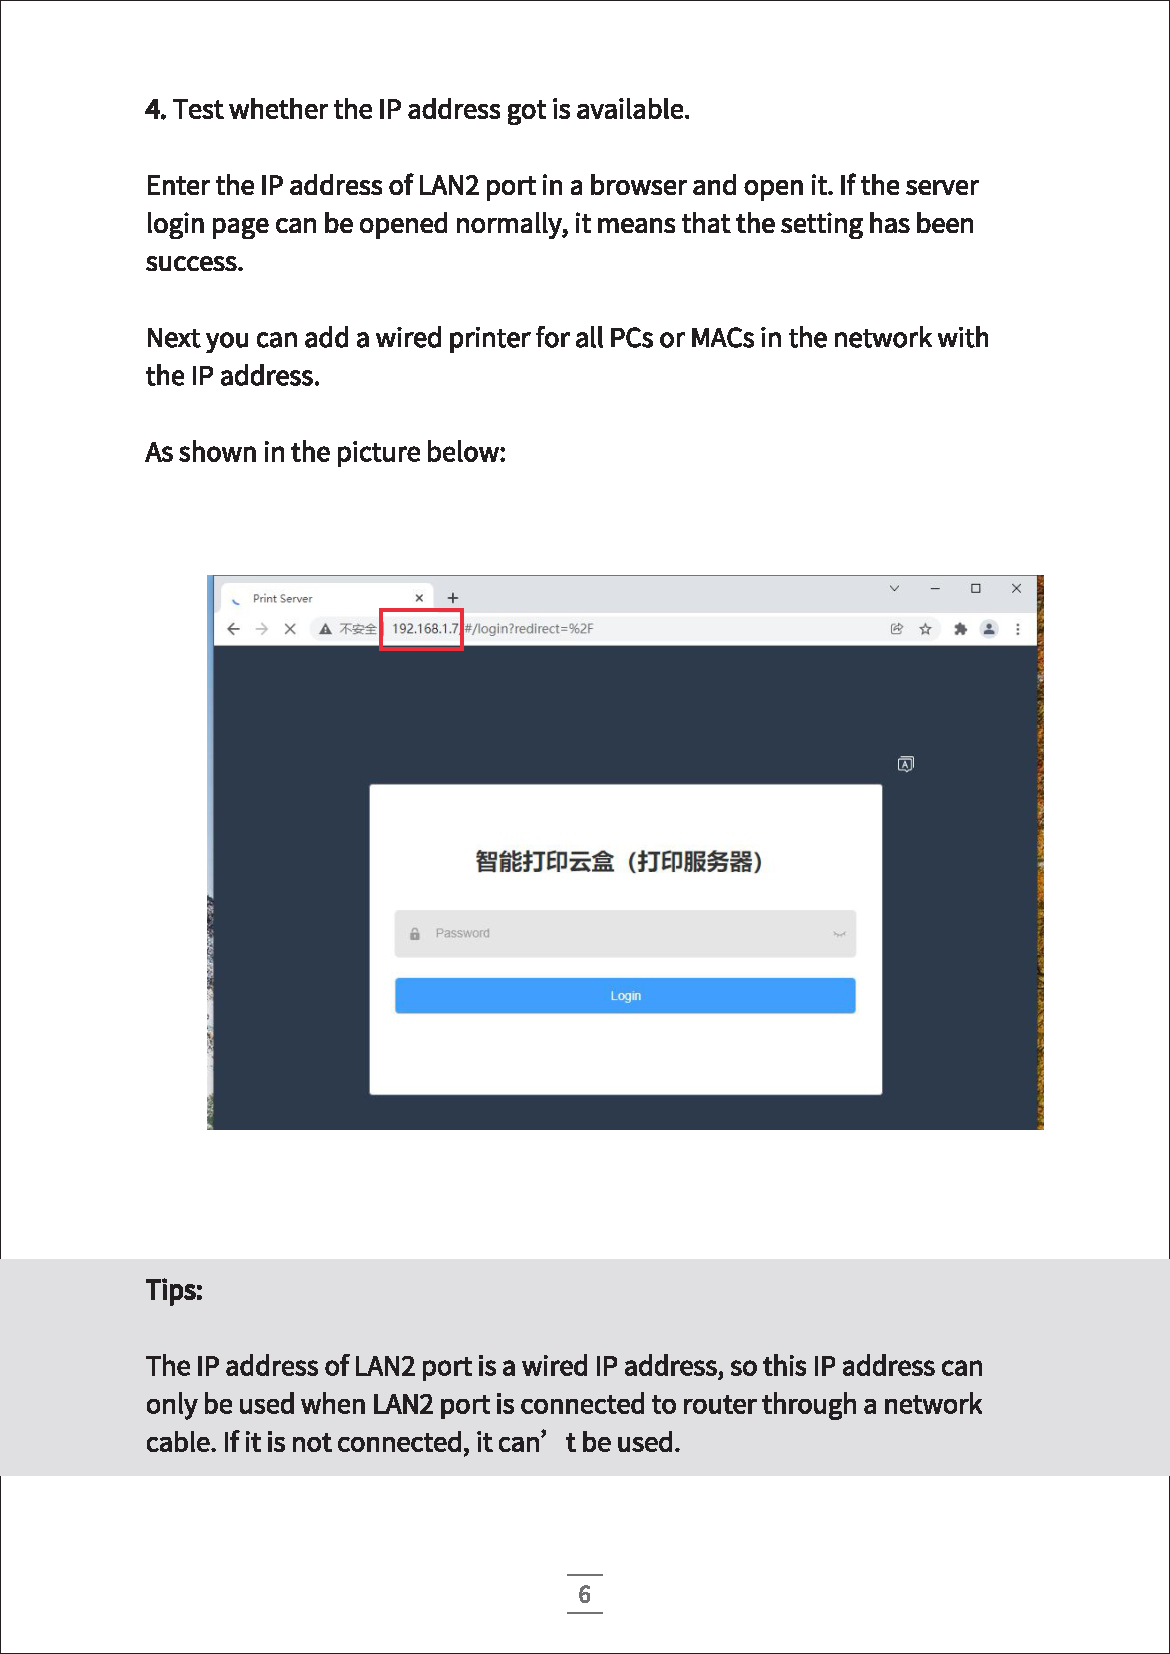
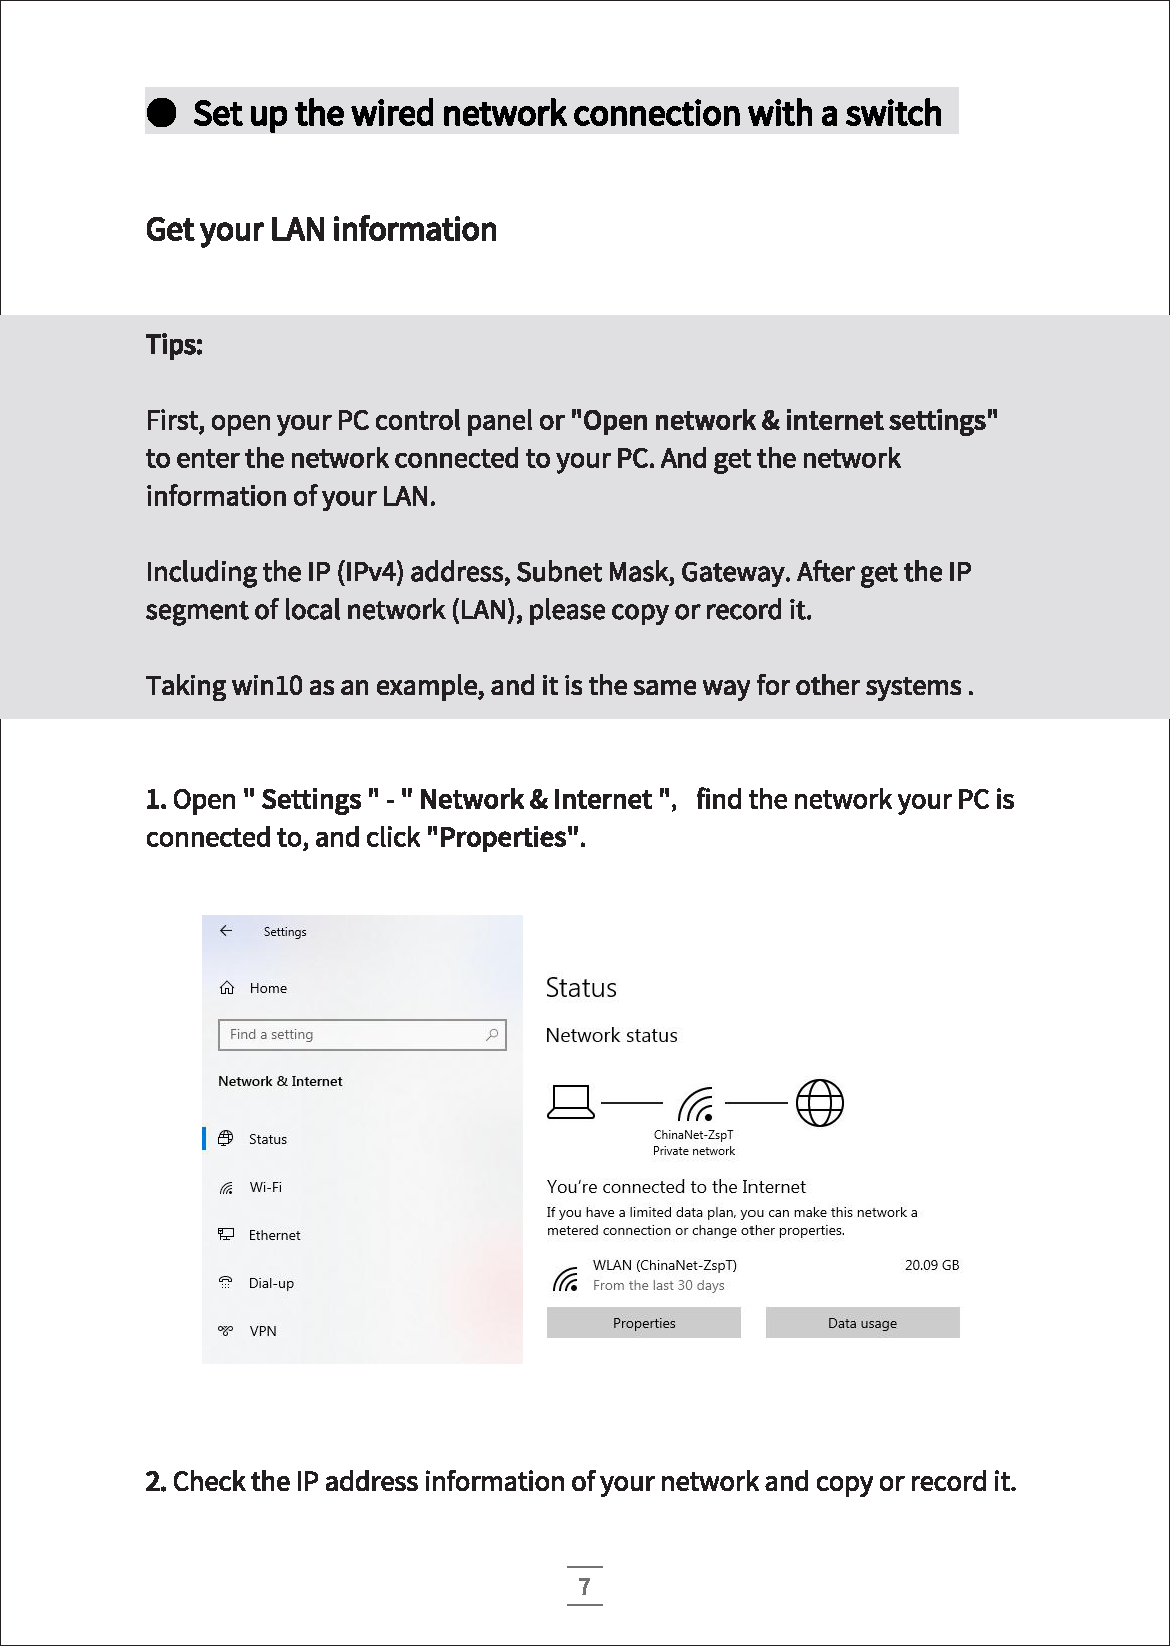
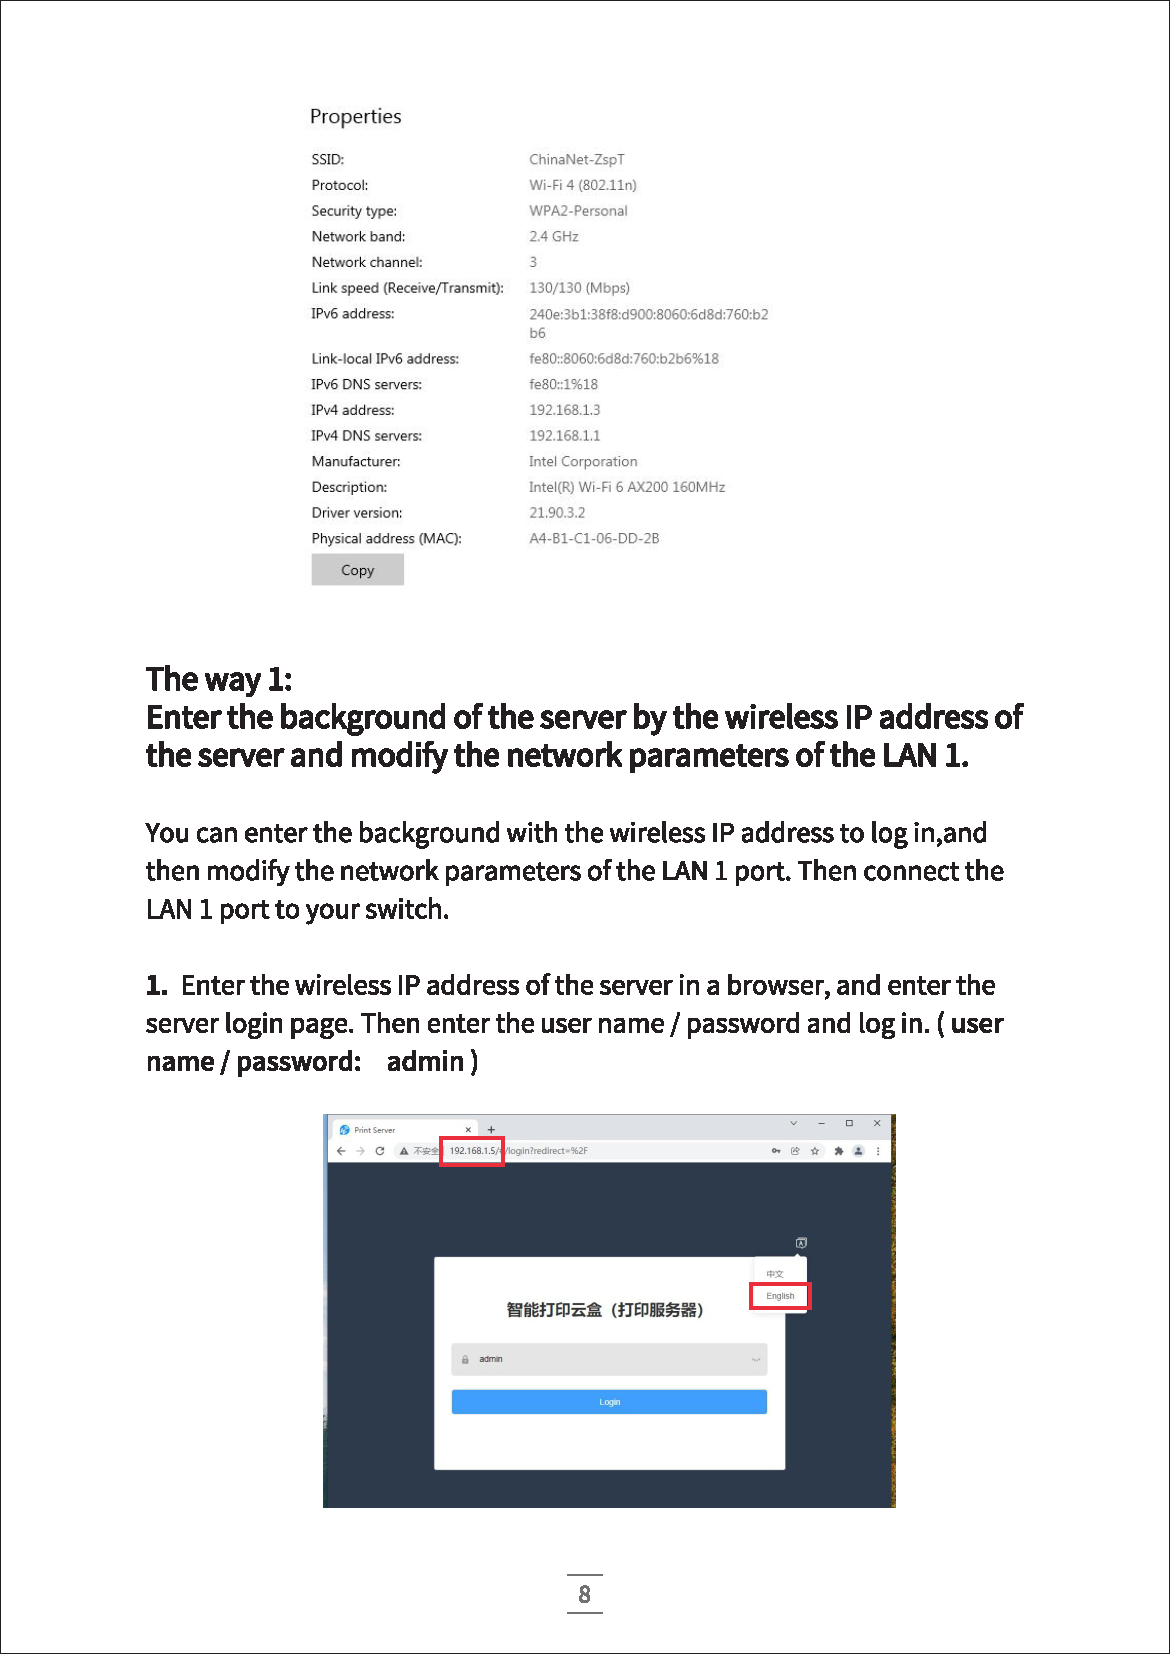
-
- How to use the print server with 2 different Lan networks ?
How to use the print server with two different Lan networks ?
After do some network settings on the server, and the print server can be used with two different networks at the same time.
In theory, it can be used with a maximum of three different network segments at the same time.
The Wifi connect to one LAN network, the LAN1 port connect to one LAN network, the LAN2 port connect to one LAN network.
But in most cases, customers only need to connect 2 LAN networks at most. We usual will recommen our customers to connect by WiFi and LAN 2 port first
If you need to use the server on 2 Lan different networks at the same time,
The setting method is as follows:
1. In Lan 1(one of the two different LAN networks you want to connect), complete the connection settings (wireless and wired) between the print server and your Lan 1. And make sure that the computers in your Lan 1 can share the print server normally.
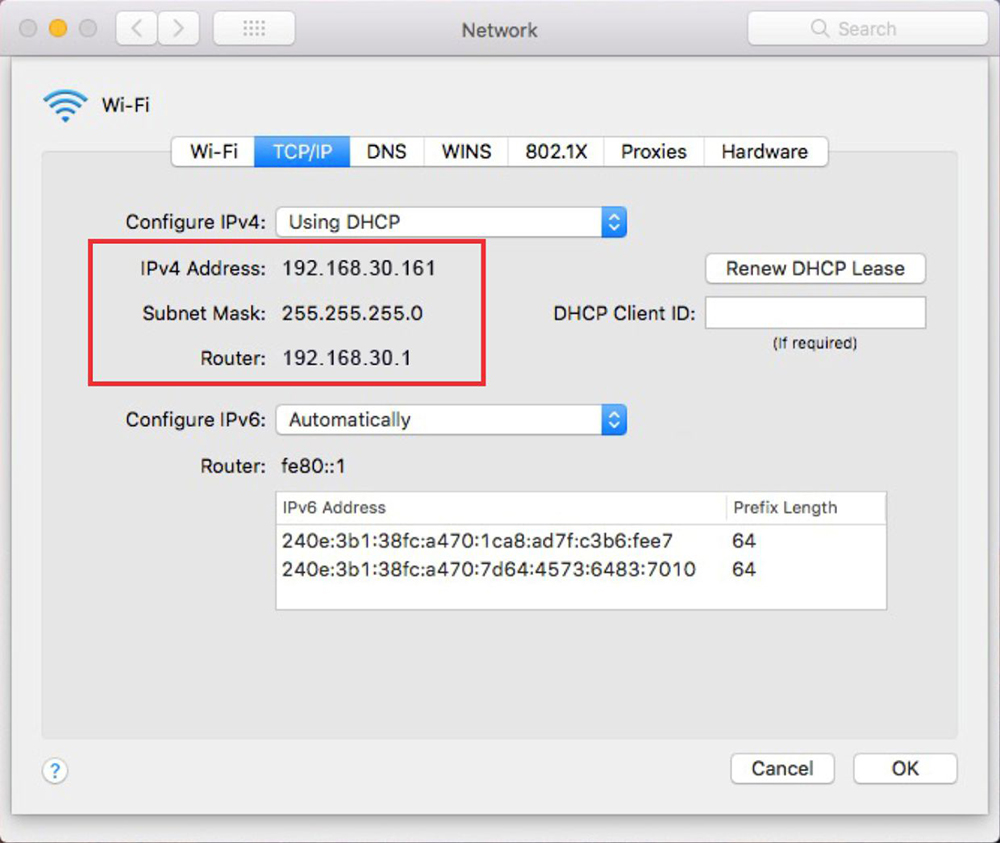
2. Get the network segment information of your LAN 2.
You can view the network information of your LAN 2 on anyone of the computers in the LAN 2, to get the IP network segment of your LAN 2 and record it.
Such as IP: 192.168.30.161
3. Set up the IP of the server LAN 2 port according to the IP segment information of LAN 2 you got.
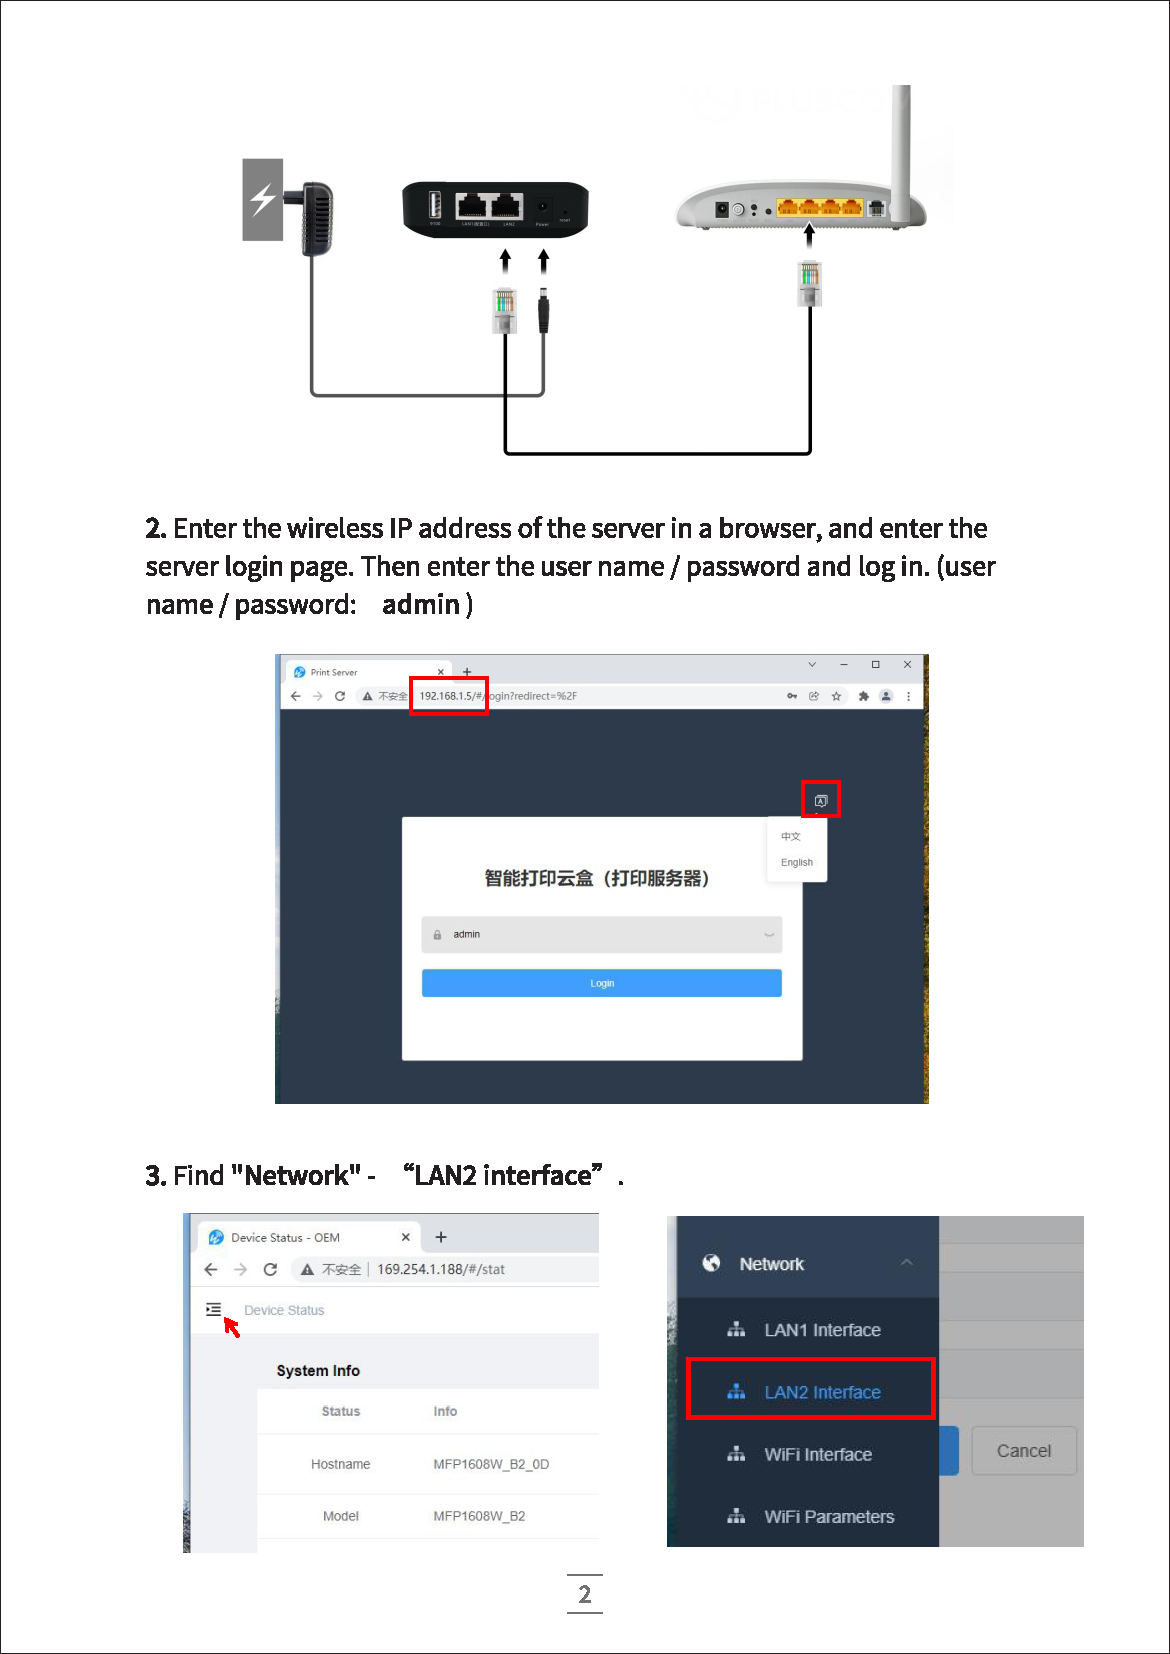
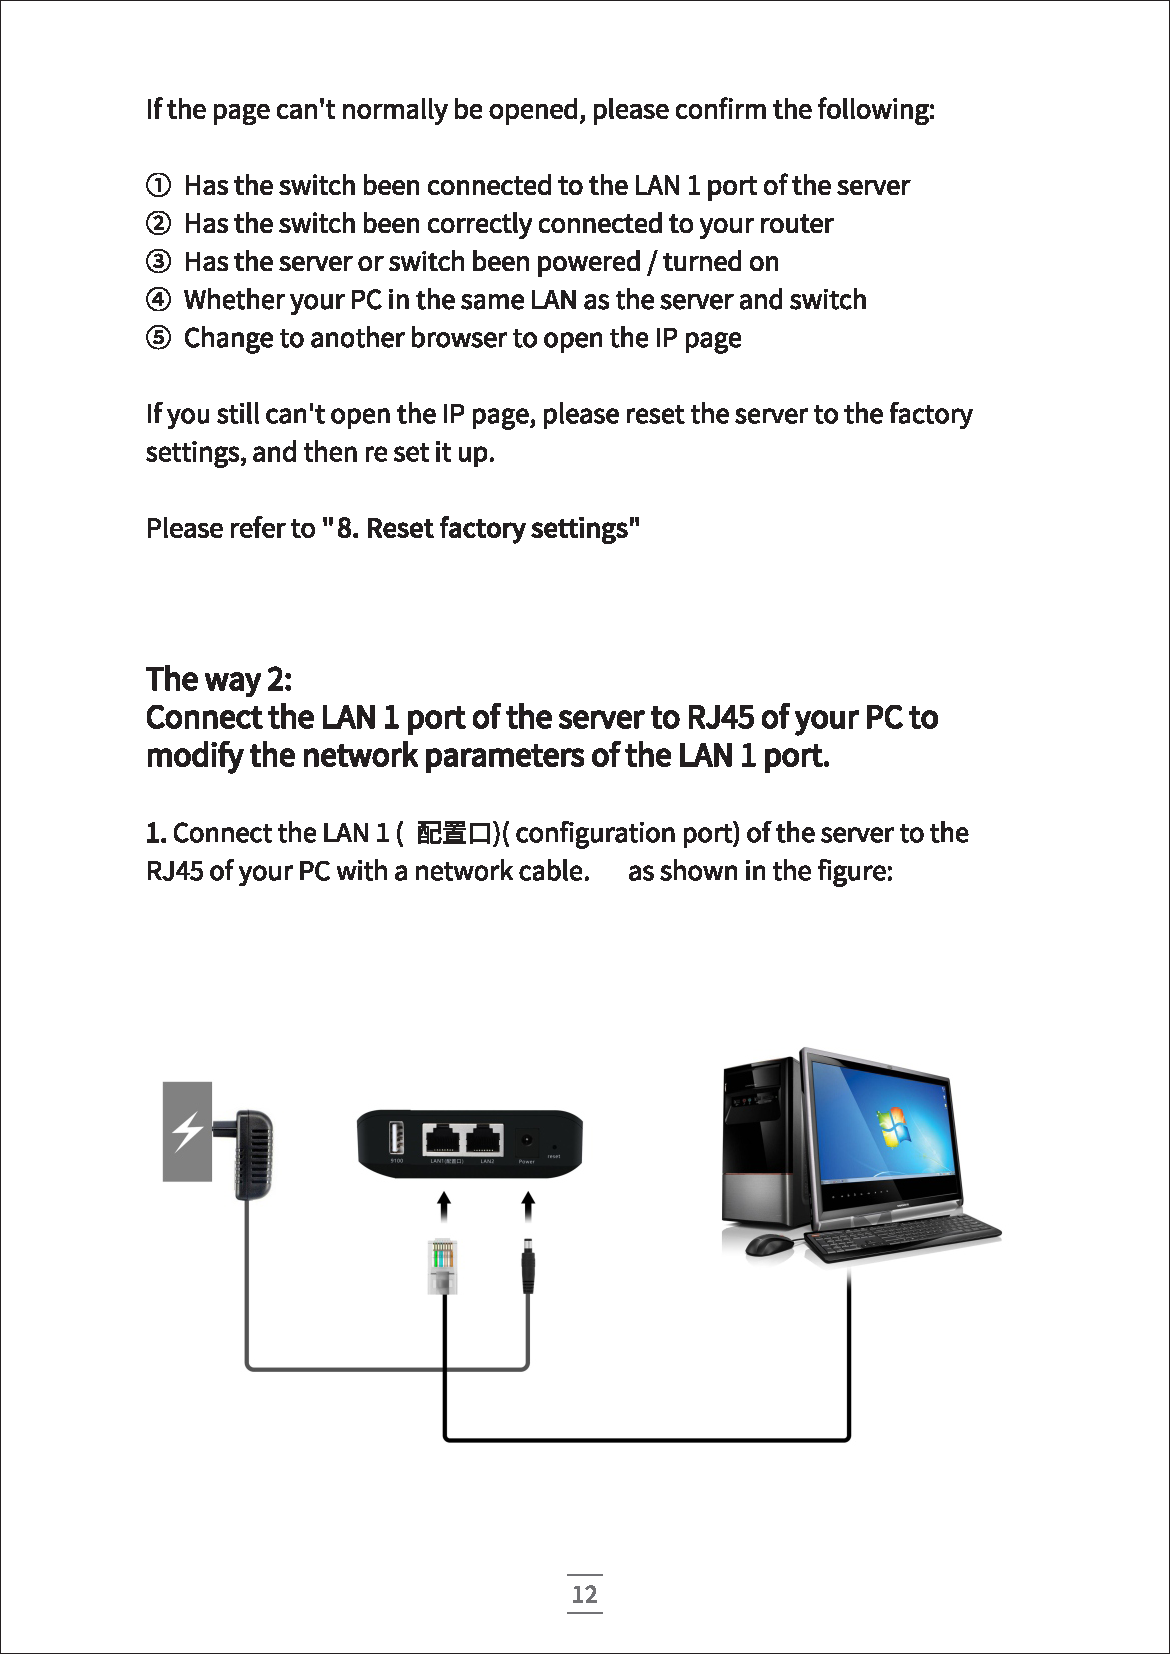
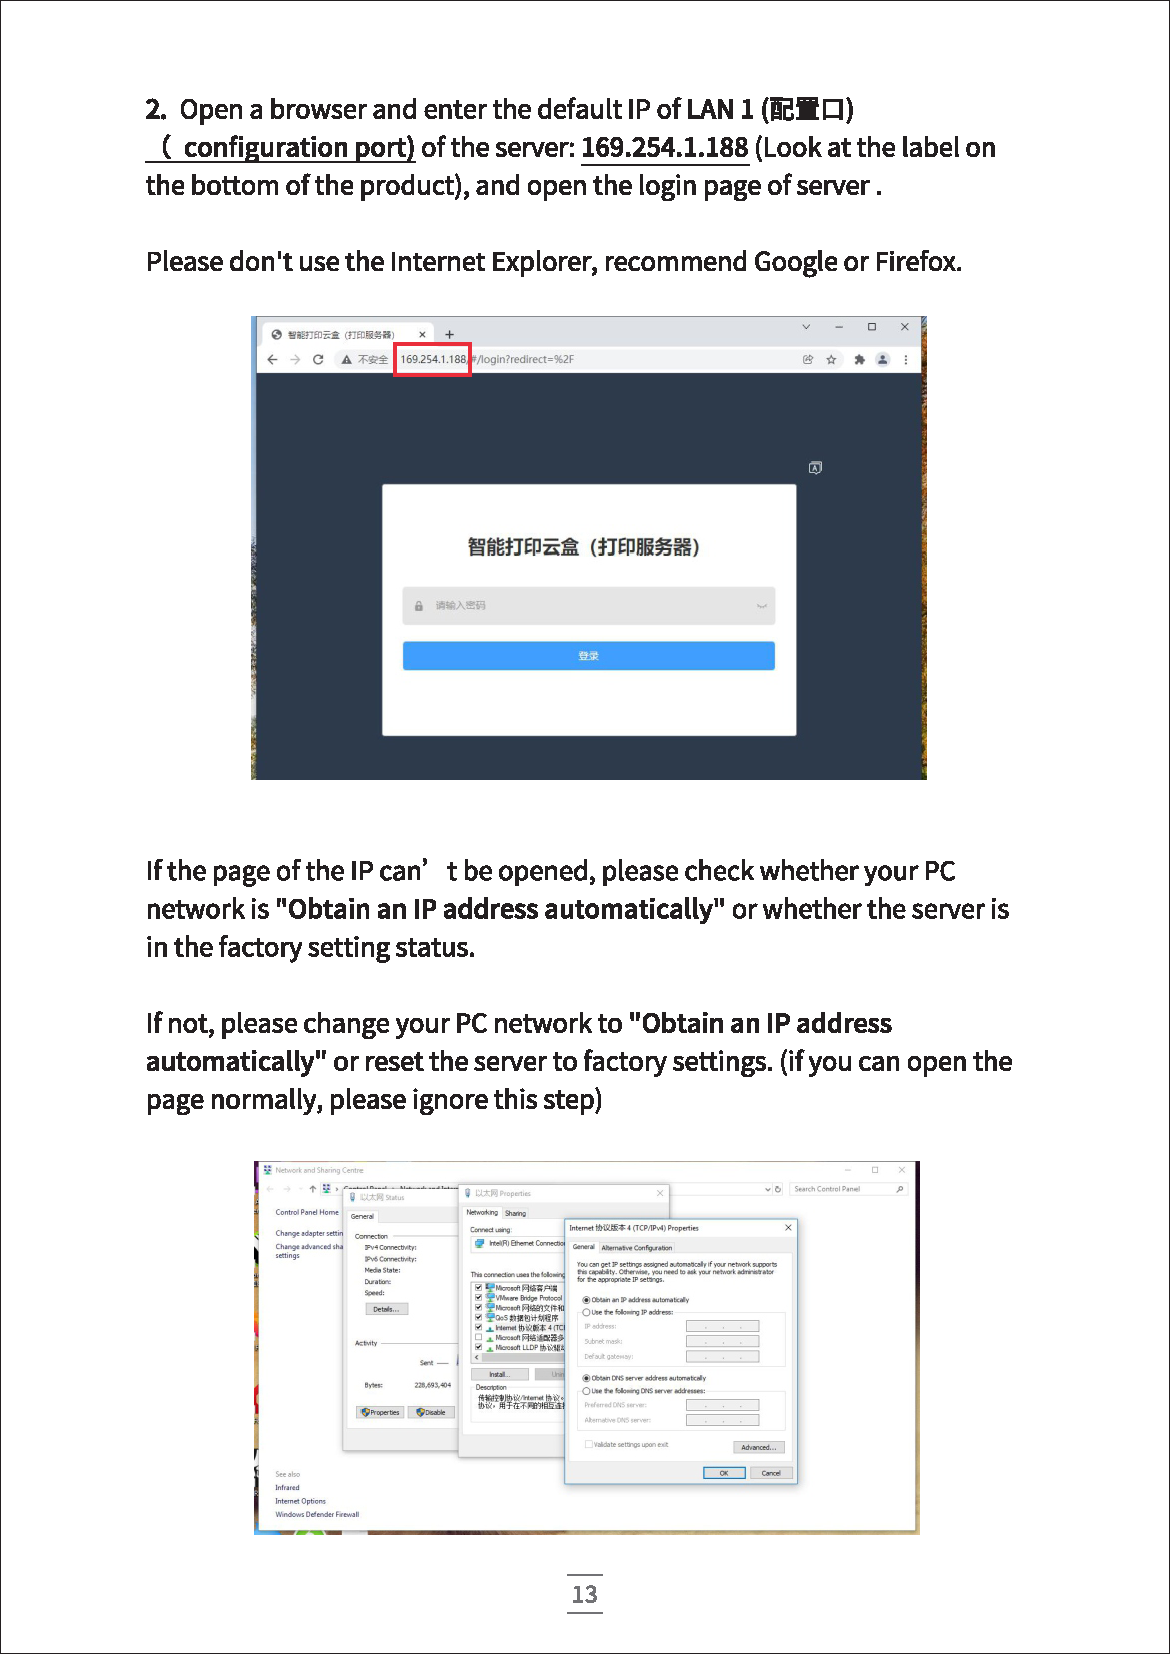
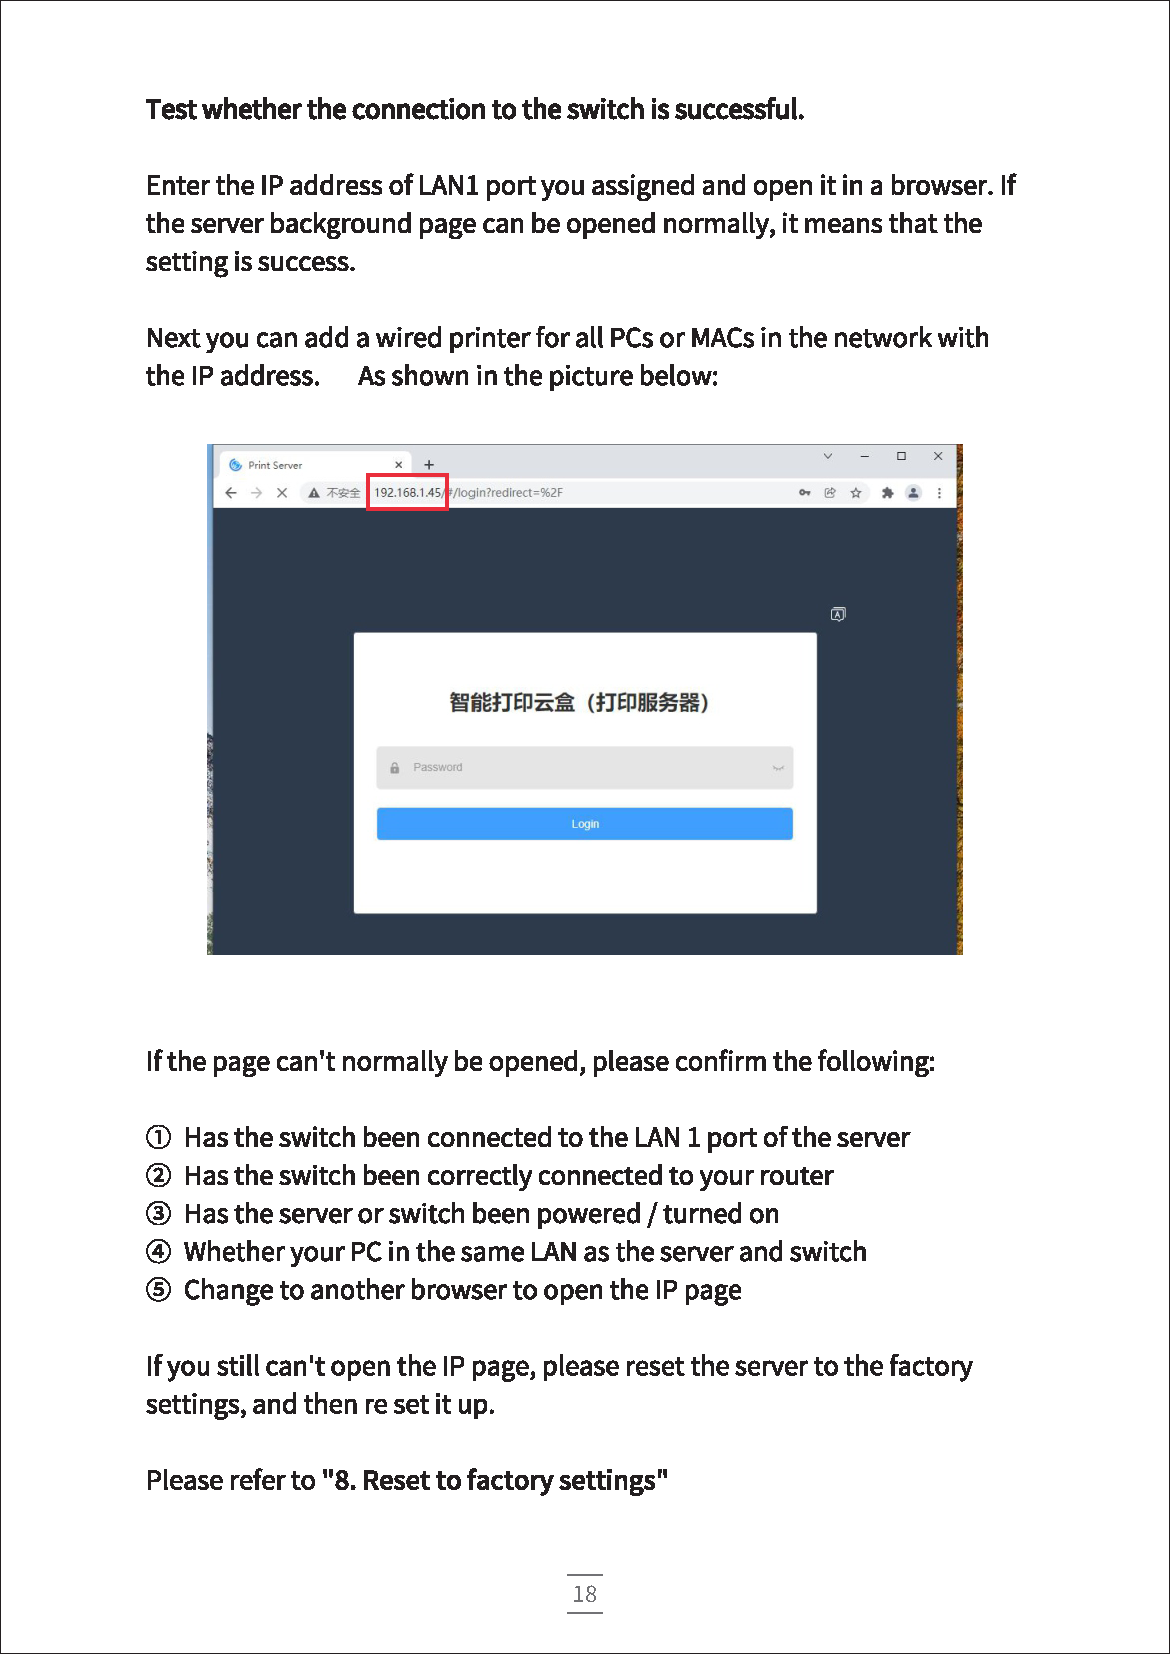
① On a computer in your LAN 1, enter the IP address of the print server in a browser (It is the IP address the server in your LAN 1). Then log in and enter the background of the print server.
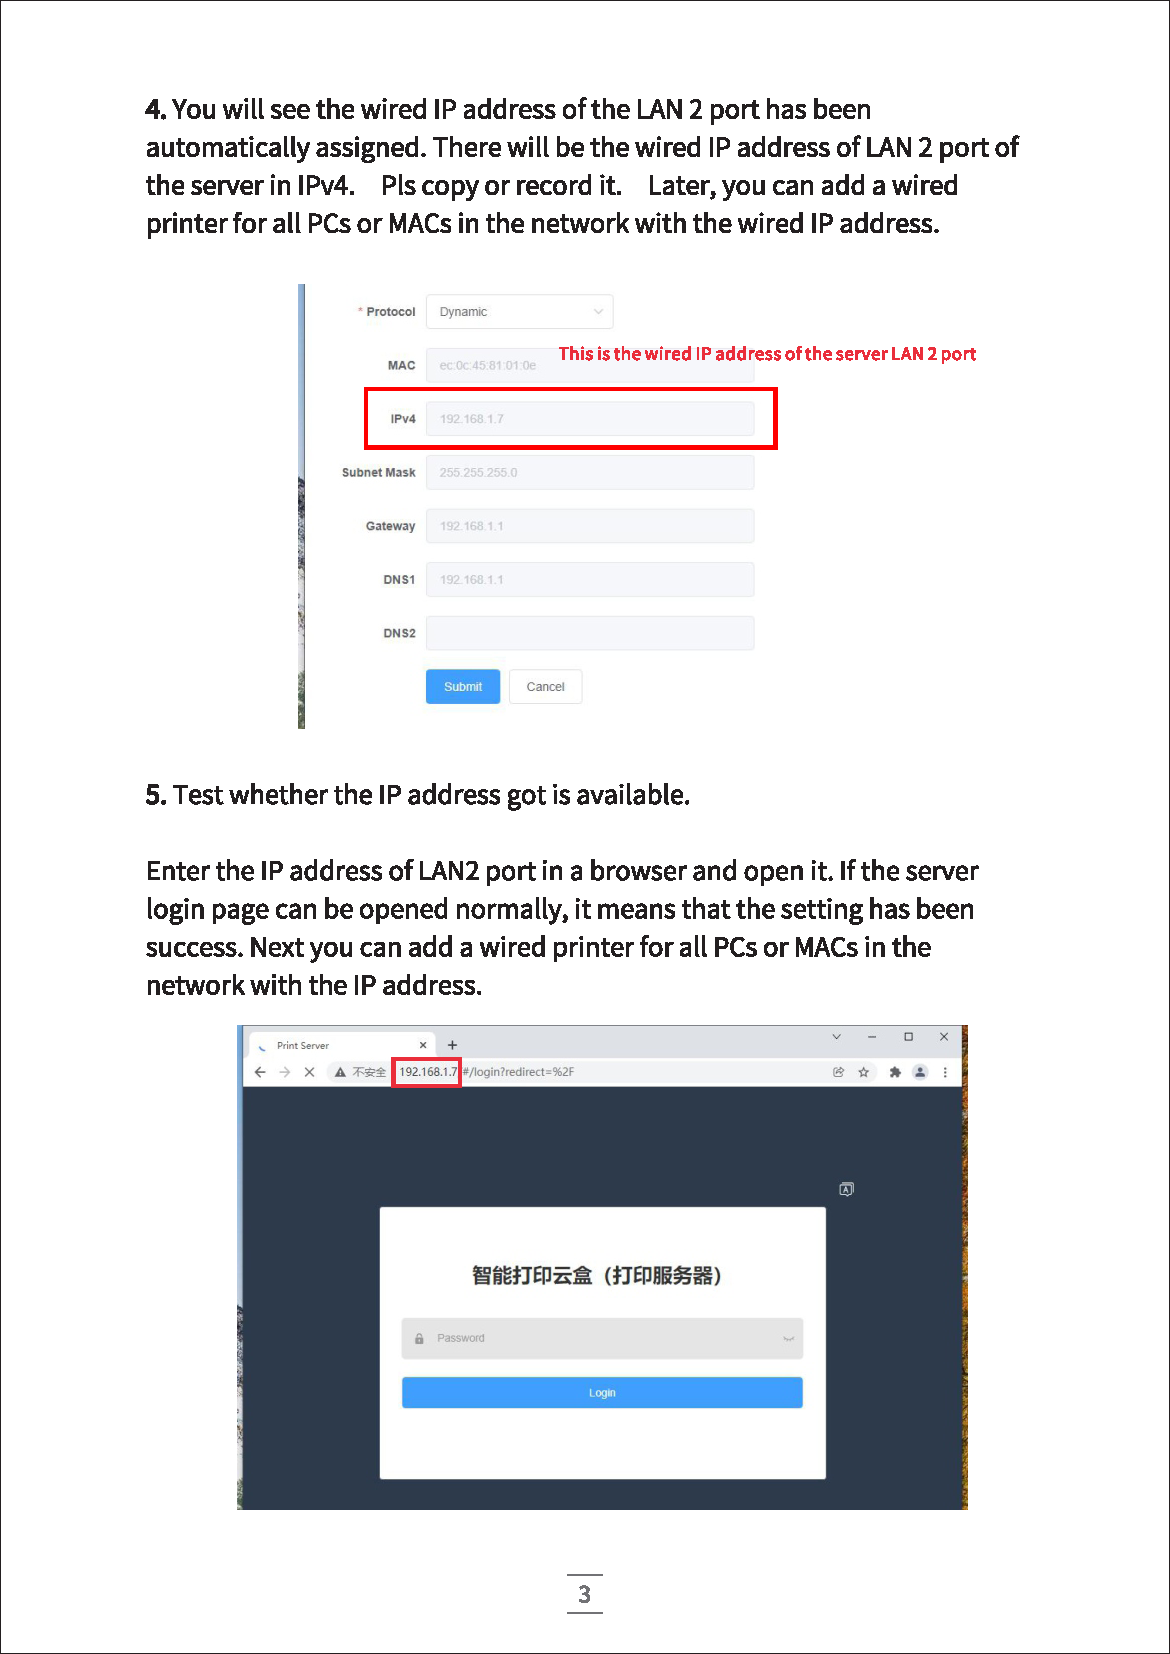
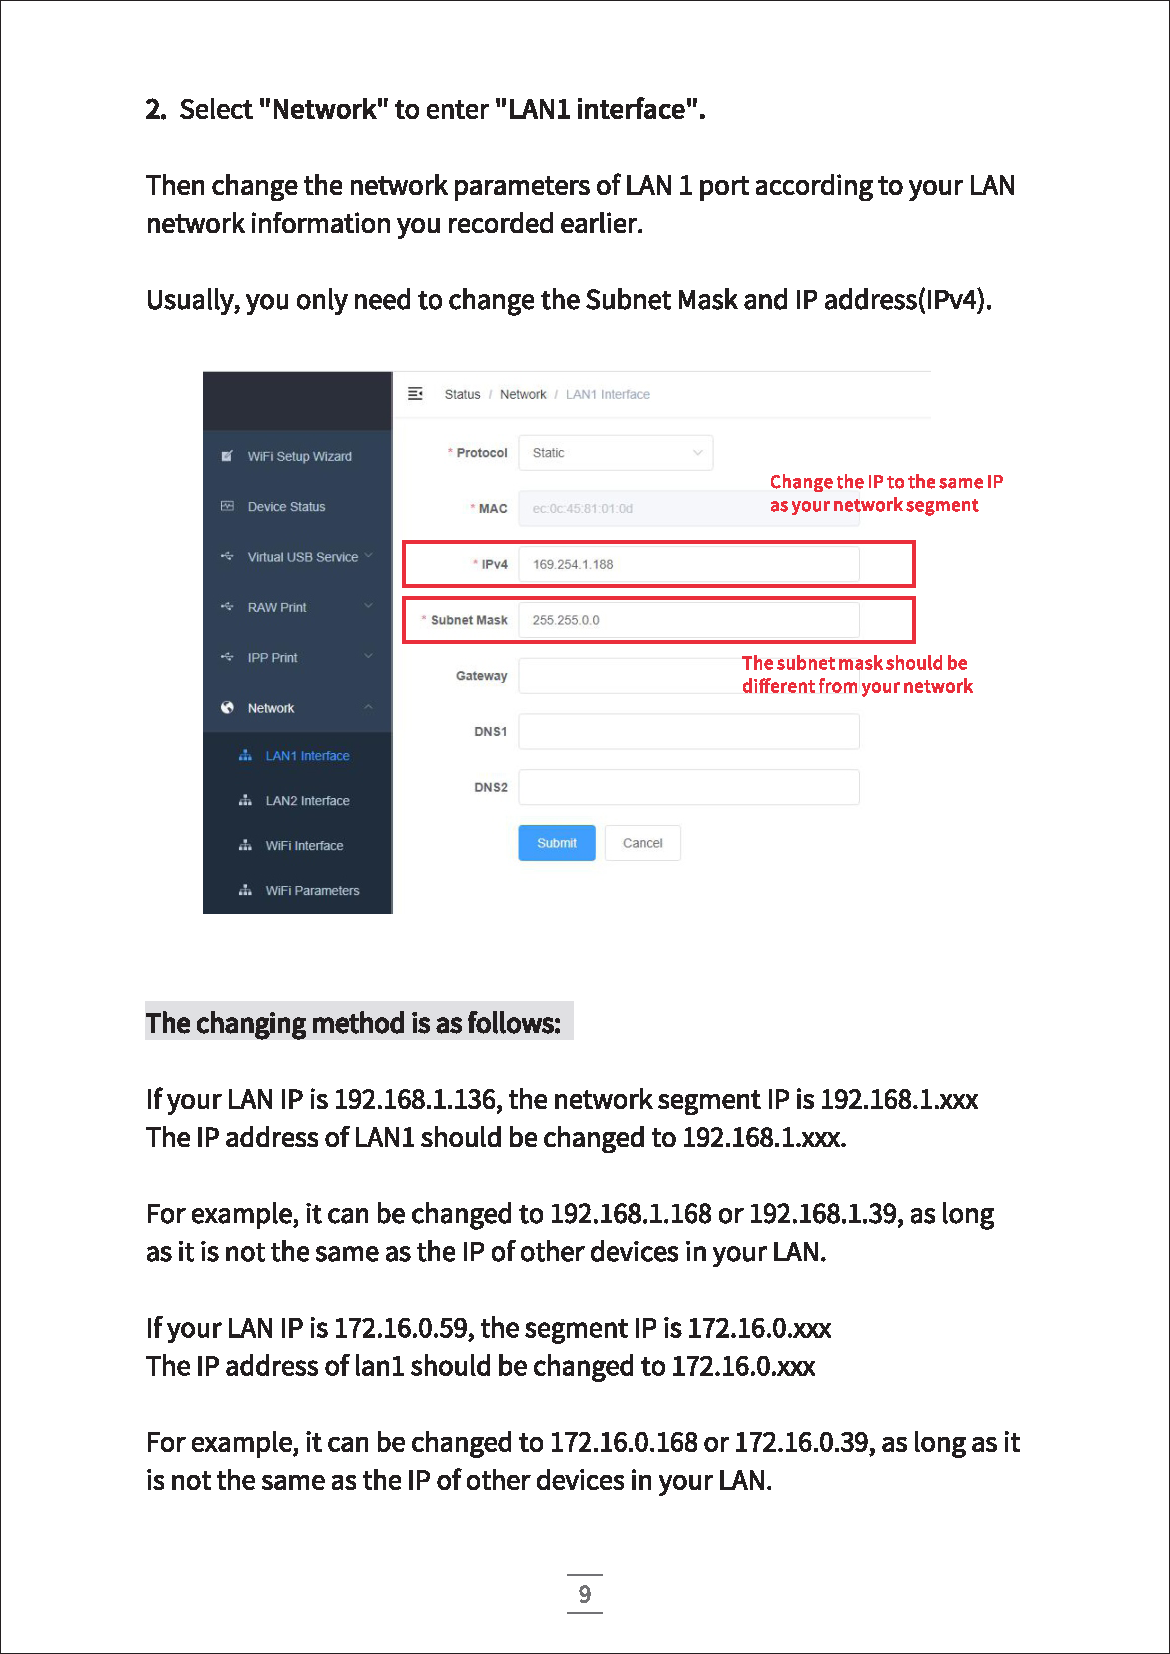
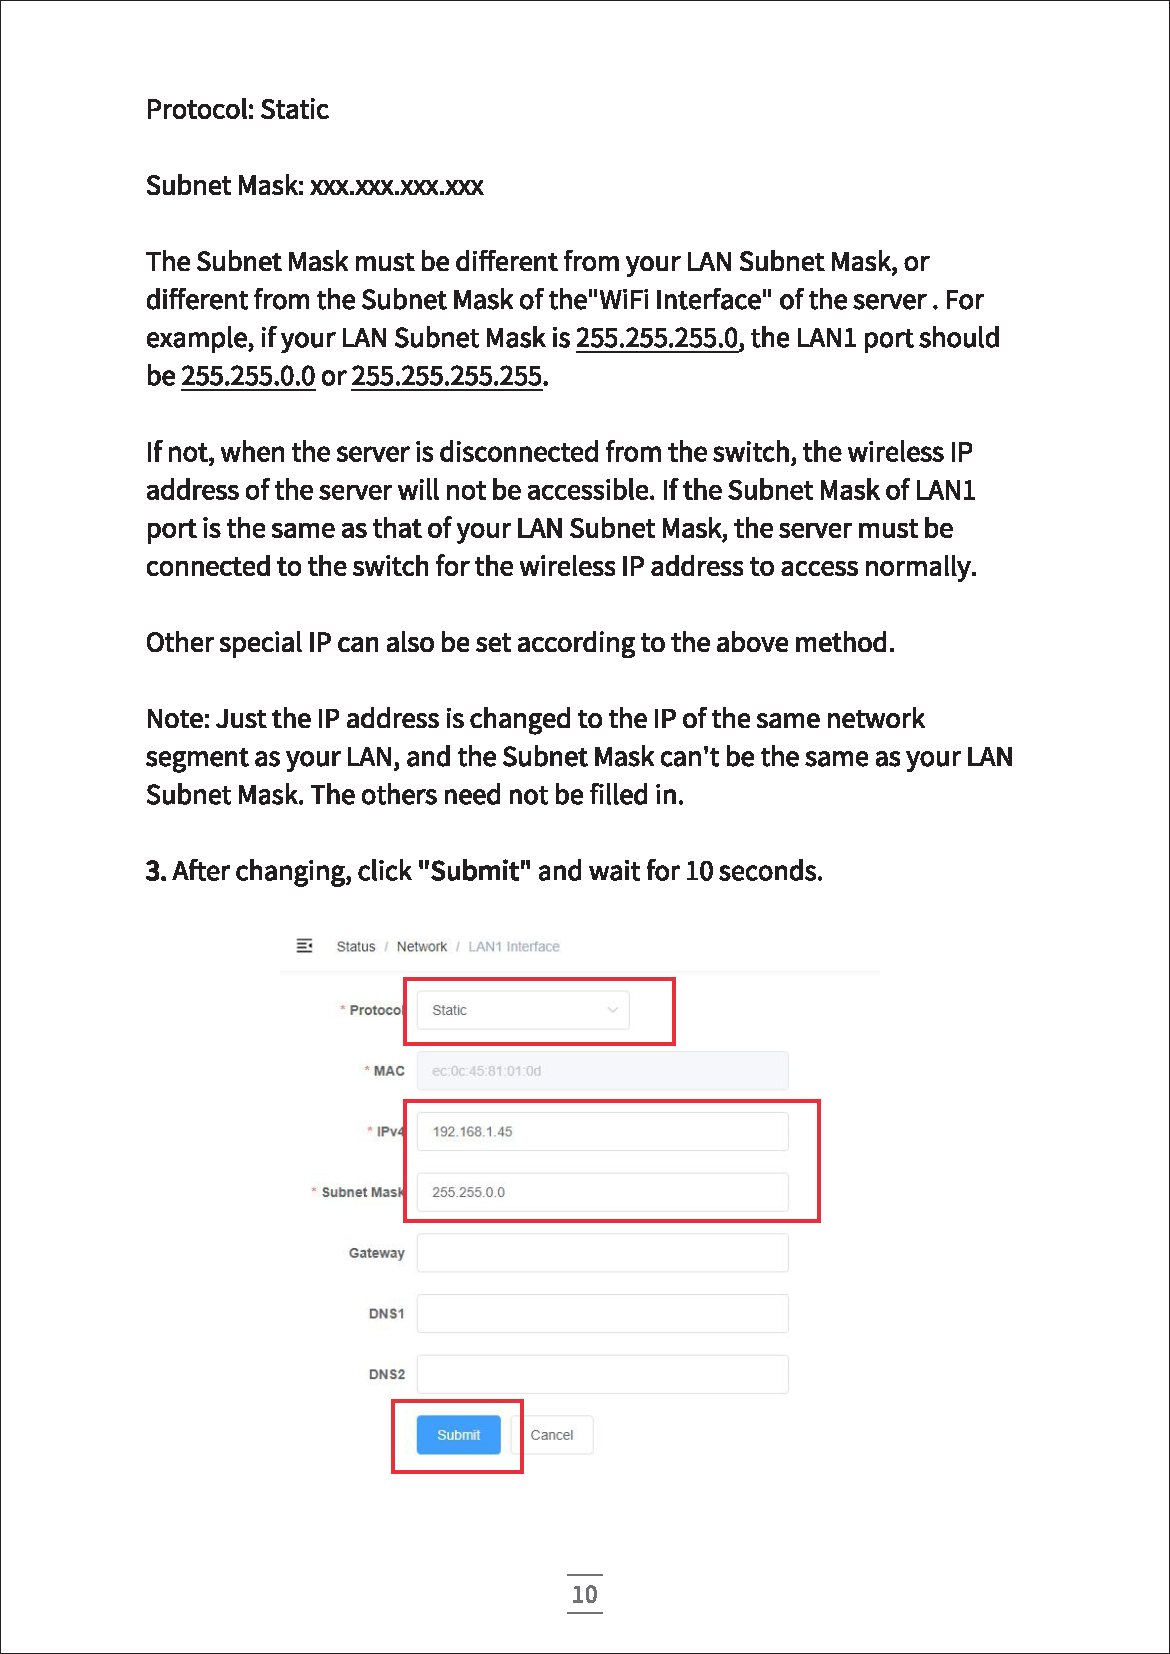
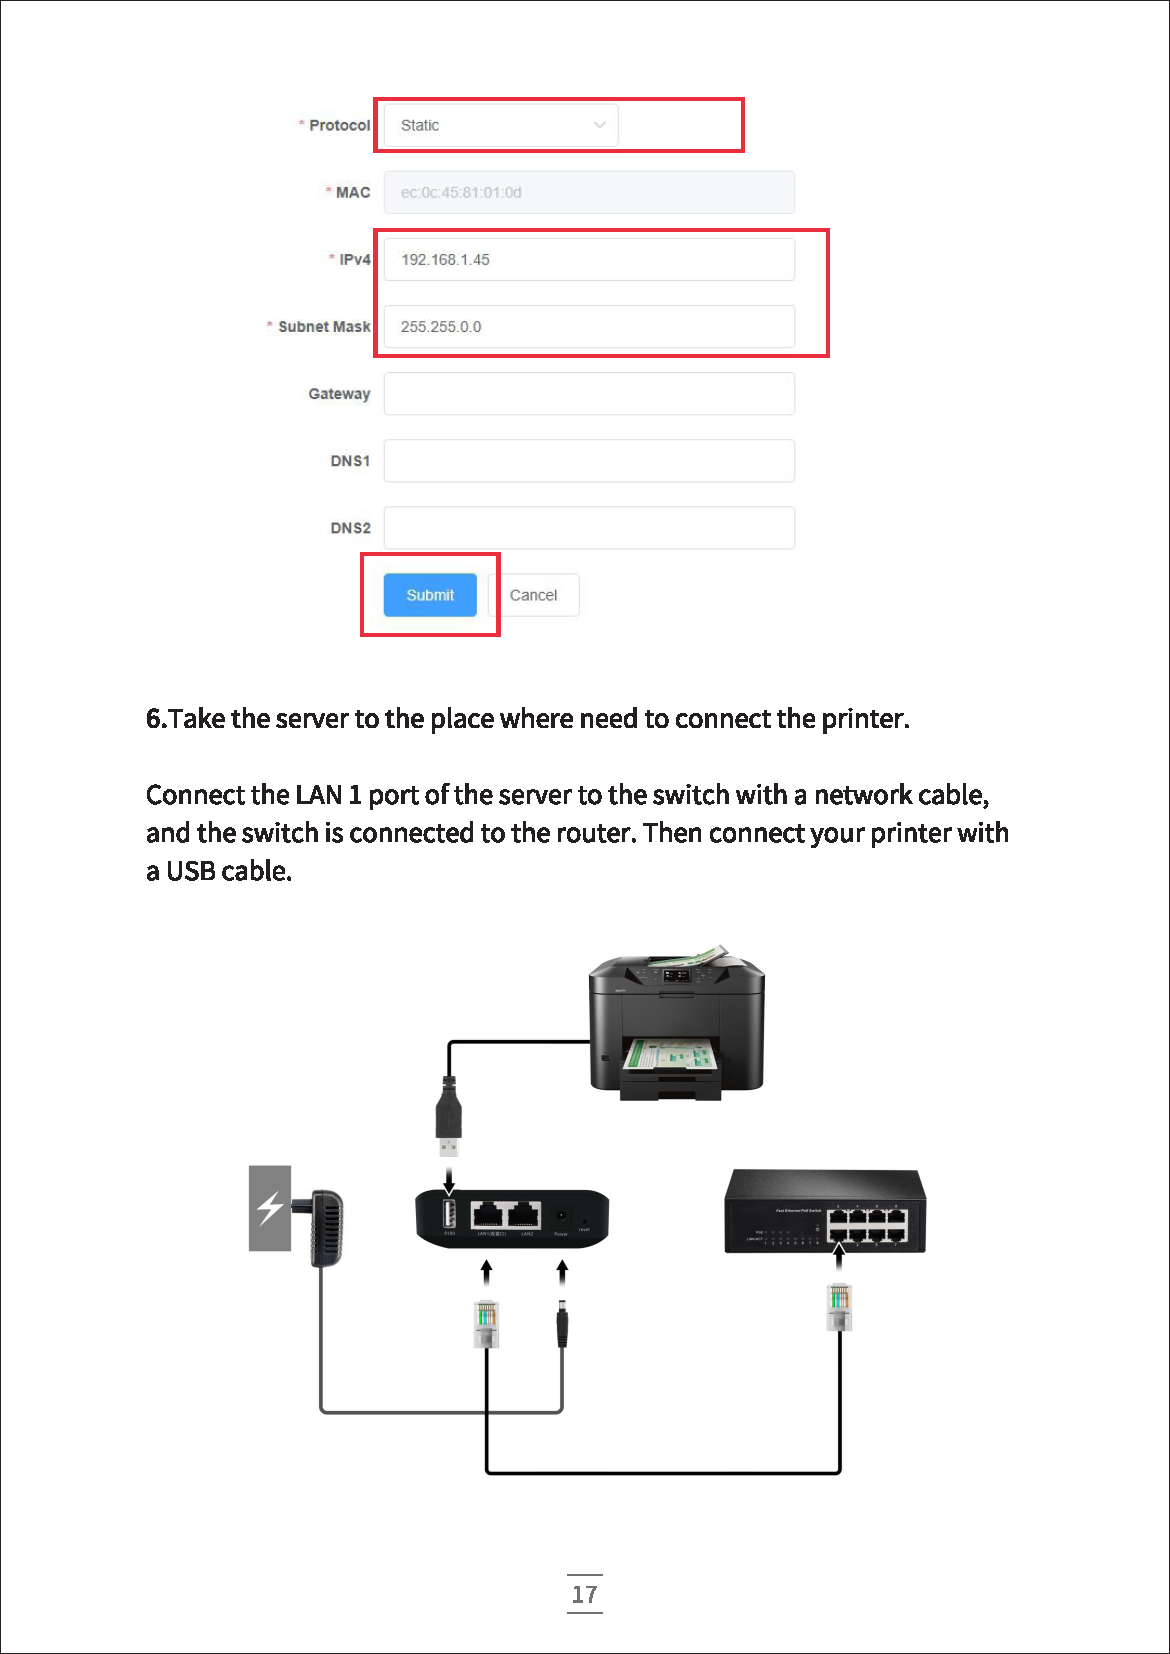
Find "LAN2 interface" - "Protocol" and select "Static"
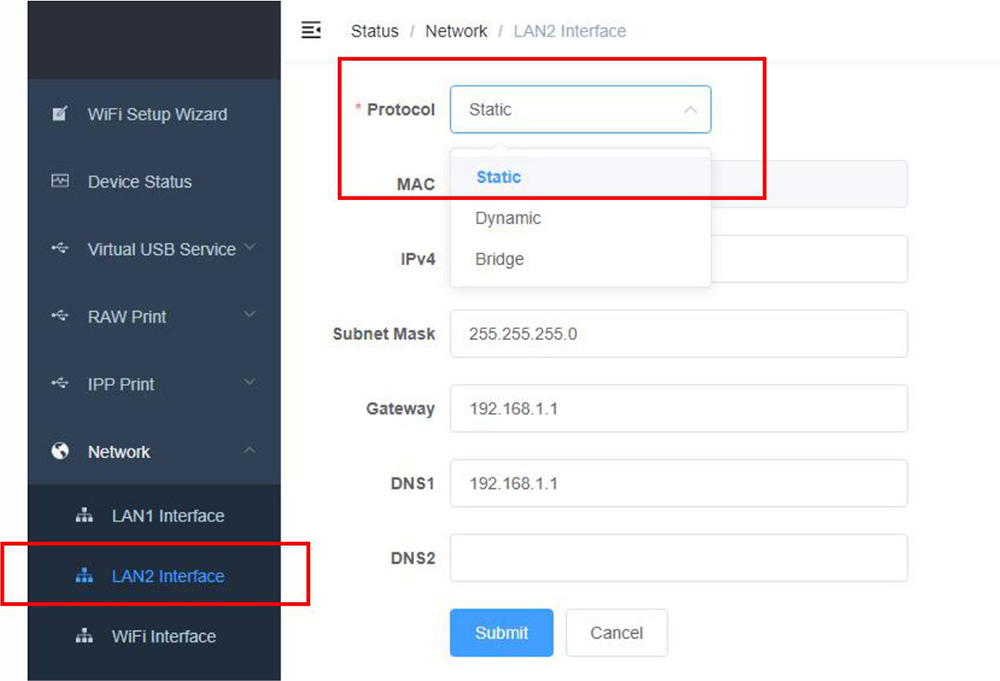
② Add an IP address of the same network segment as LAN 2 in IPv4.
For example, the IP of your Lan 2 network is: 192.168.30.161
You can set up the IP address of Lan 2 port to: 192.168.30.188
Or 192.168.30.XXX and so on.
This IP address can't be conflicting or same with IP addresses of other devices in your LAN 2.
The same is true for other types of IP addresses.
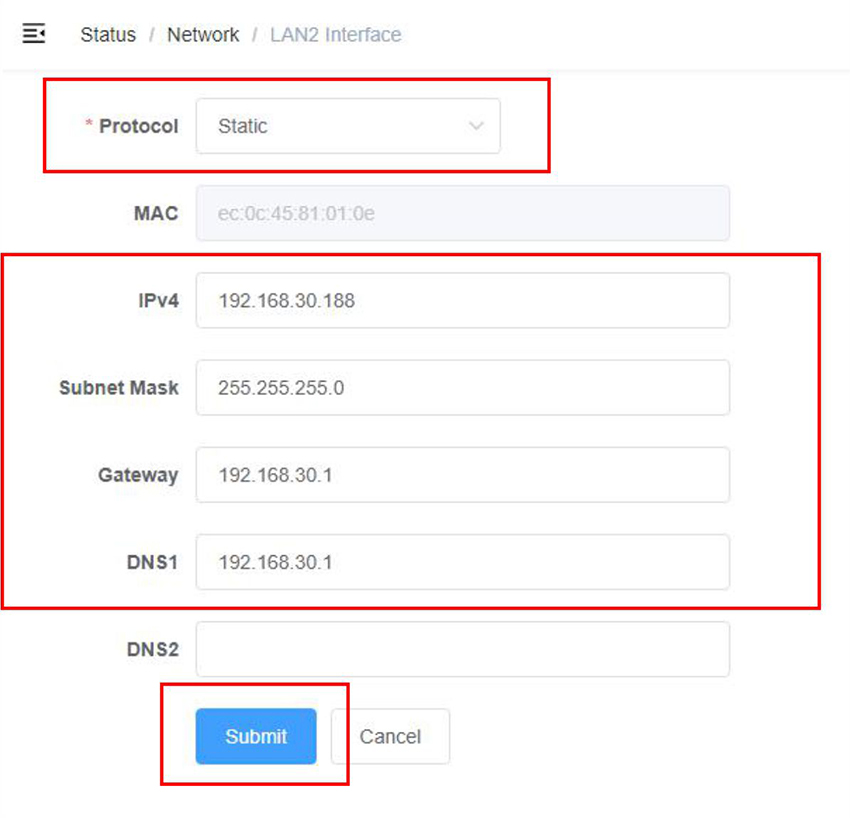
Then click "Submit"
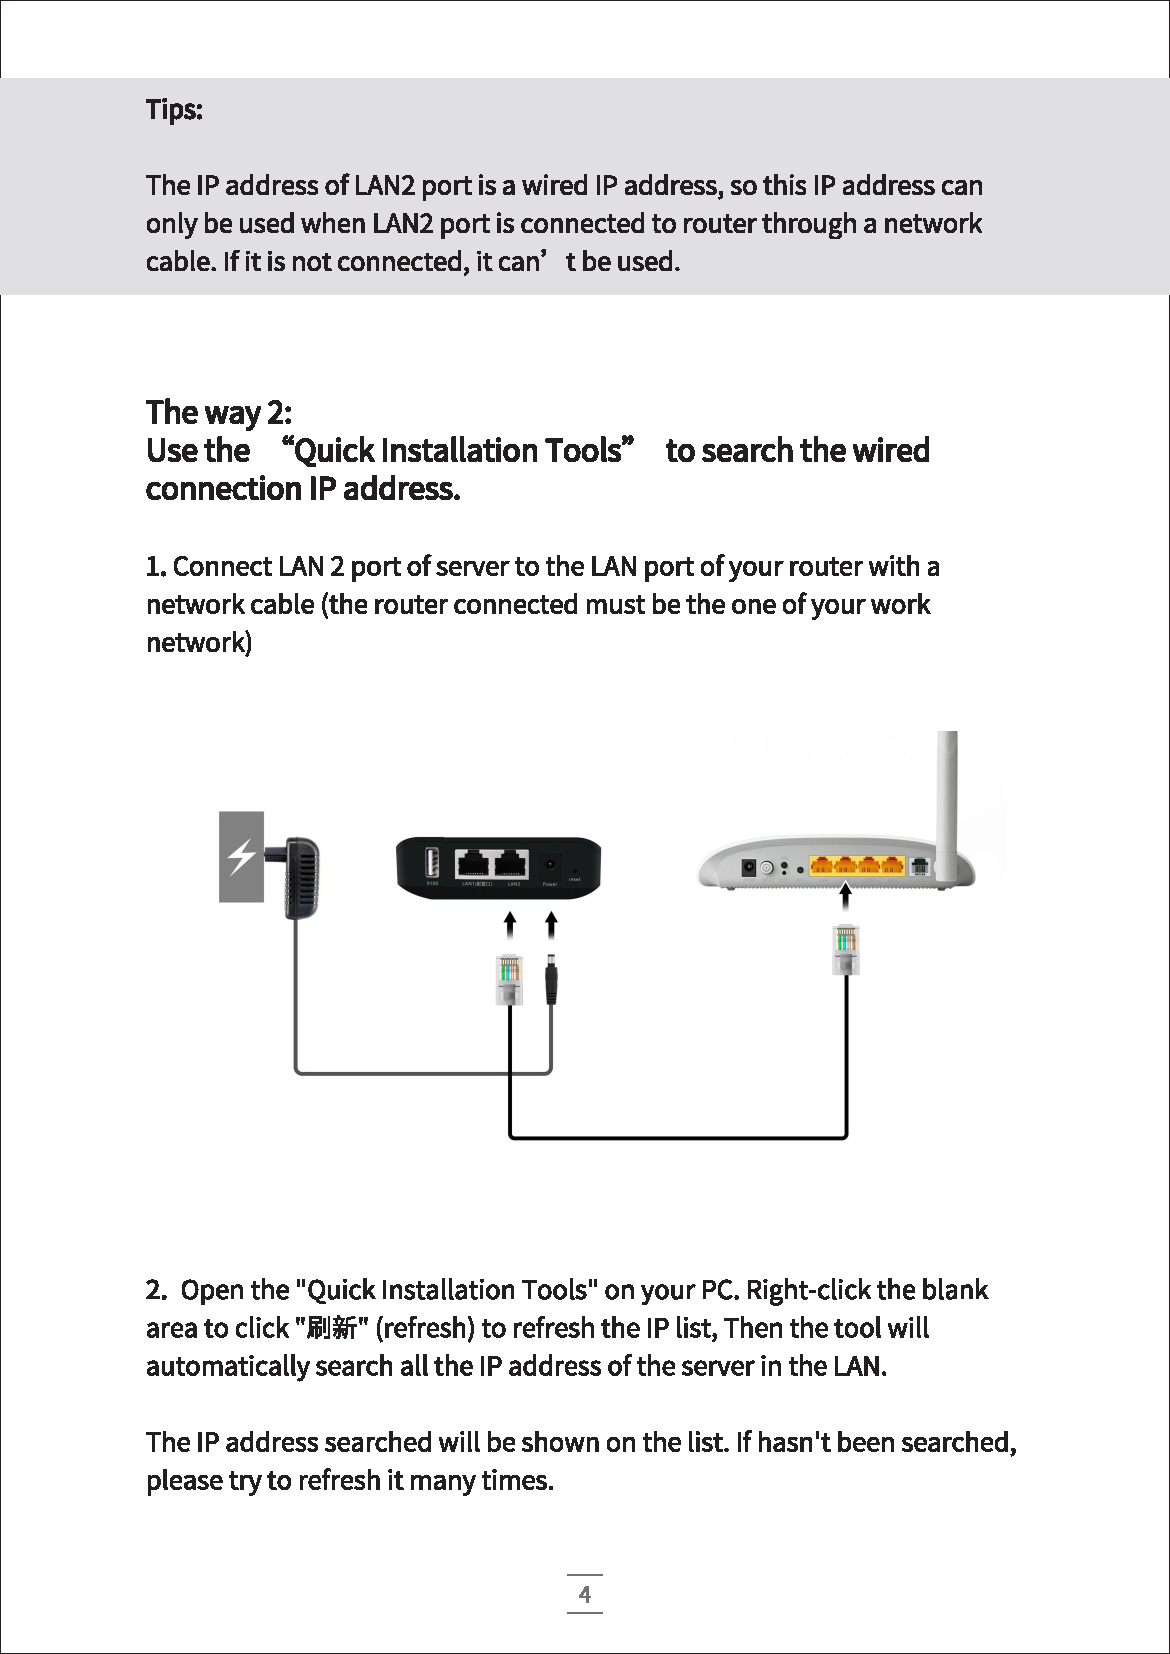
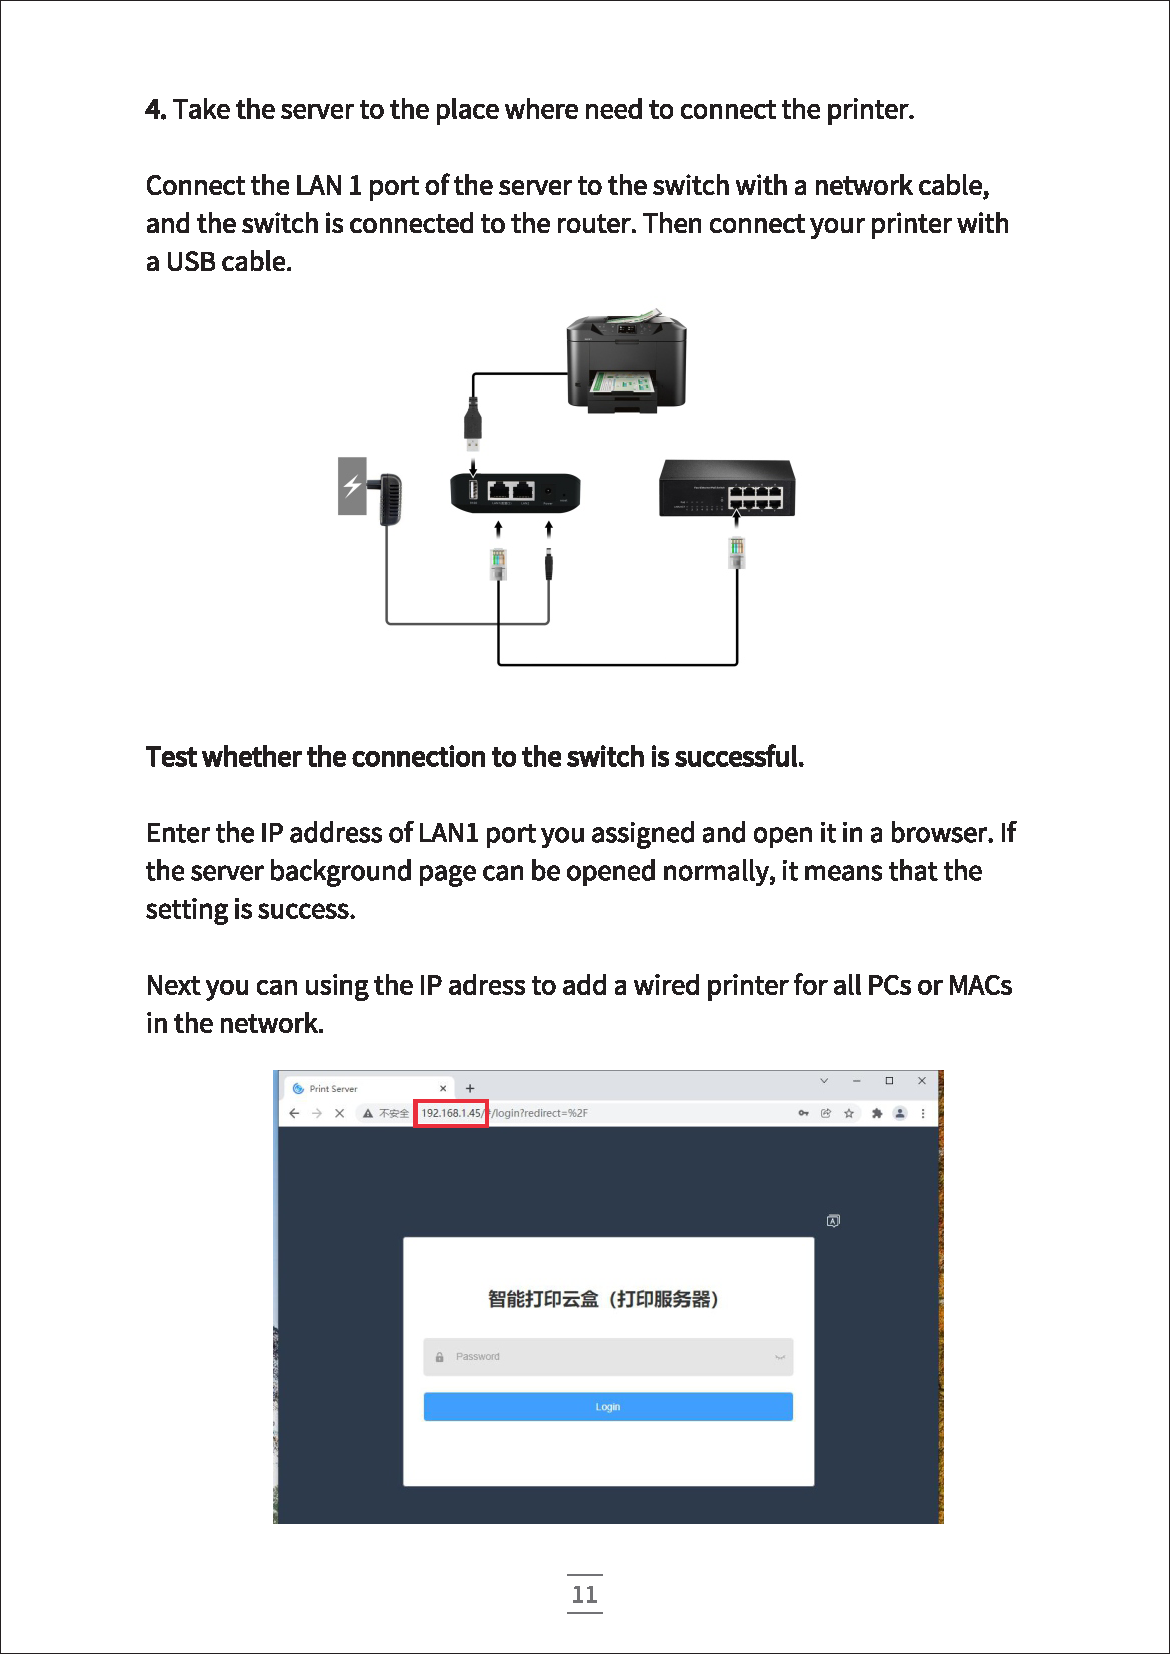
4. Connect the LAN 2 port of the server to the network port of the router or switch of your LAN 2 network by a network cable. Then you can use the IP address you set up for the Lan 2 network to add a printer or a USB device to any computer in your Lan 2 network.
In this way, your Lan 1 is connected to the server through WIFI, and your Lan 2 network is connected to the server through Lan 2 port of the server.
As shown in the figure below:
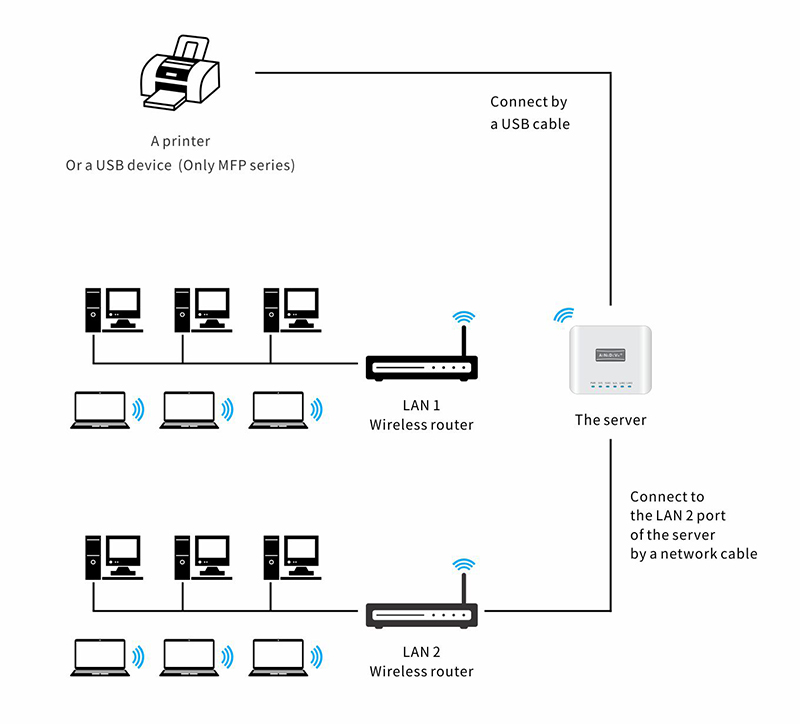
Of course, you can also use this method to set up your Lan 2 wired to LAN 1 port of the server and your Lan 1 wired to LAN 2 port of the server.
The premise is that the connection setting between the server and one of your networks has been completed, and then enter the server background through the server's IP address, and modify the IP of LAN 1 port or LAN 2 port to the IP of the same network segment as the second LAN you need to connect to.
-
- Why do the printer I added suddenly fail to use (For MFP101W-B2)?
MFP (multi-function) series print / share server has two different functions, one is to share printer, the port is IPP or RAW, through TCP / IP protocol communication; The One is a shared USB device, which uses USB port and communicates through USB protocol.
If you are using our MFP (multi-function) series print / share server, if the printer you added before and used normally suddenly fails to work, it may be that when you print files, the USB port of the server is occupied by a user and share the USB device at the same time, or after sharing the USB device, The USB connection tool did not disconnect from the USB device,resulting in your inability to print.
The USB port of MFP (multi-function) series print / share server cannot use TCP / IP printer and share USB device at the same time. Otherwise, when the USB device is shared, the USB port will be occupied and the printer cannot be used.
If you encounter this situation, please let all users to disconnect from the USB device on the server and stop sharing the USB device. And you can also try to power off the server and restart the server again. After the USB port is no longer occupied, you can use the printer normally.
Of course, you can also directly connect and use the printer through the "shared USB device", but this method requires running the "USB connection tool" to connect to the USB device on the server. If the shared printer is added through IP address, you can directly send the print command to the printer without running the "USB connection tool" to connect to the USB device on the server.
You can choose the suitable working mode according to your actual situation.
Thank you!
-
- Why is it that when I disconnect the wired connection between the print server and the LAN, the wireless connection can't communicate with the LAN or the connection is error?
When setting up the connection between the print server and your LAN, please first set up the "wireless connection" of the print server, and then set up the "wired connection" with your LAN (wired connection to your router or switch). In this way, even when the print server is disconnected from the "wired connection" of your LAN, the "wireless connection can still communicate with your work network (LAN) and can be used normally.
Otherwise, if you first wired the server to your LAN (connect your router or switch), and set up "wired connection", and then set up "wireless connection". When the server is disconnected from the "wired connection" of your LAN, the "wireless connection" between the server and your working network will be unable to communicate and unavailable.
So please first set up the "wireless connection" between the server and your LAN (if you don't need wireless connection, you can directly set up wired connection), and then set up the "wired connection" between the server and your LAN.When setting "unable to connect", please make sure that the lan1 or lan2 port of the server is not connected to any device“ After wireless connection is set, lan1 and lan2 ports can be connected to any device without affecting the use of wireless connection.
If you accidentally make the wrong setting, please insert into the "RST" hole by the needle (or similar object) , long press for 5 ~ 10 seconds, and release when the "sys" light flashes, the server will return to the factory settings. You can make the correct settings again on the server.
Thank you.
-
- Why after I connect the server to the router (or switch) and get the wired IP address,and after a while, the IP address page can't be opened, and I can't add a printer or USB device through the IP ?
This is usually caused by setting the "wired connection" first and not the "wireless connection" first.
If you are not that set up "wireless connection" first and then set up the "wired connection" ,but are that connect the server to the router (or switch) first, and then get the wired connection IP address through "Quick installation tools", then you may get a wired connection IP address, such as IP: 192.168.1.4 (or similar). However, after obtaining the IP, the server system will automatically change the IP to 192.168.1.188 (or similar). At this time, the previous 192.168.1.4 will be invalid, and only the IP 192.168.1.188 automatically corrected by the later system will be available.
Therefore, in order to avoid trouble, please set the "wireless connection" of the server first, and then set the "wired connection"
If you accidentally make the wrong setting, please insert into the "RST" hole by the needle (or similar object) , long press for 5 ~ 10 seconds, and release when the "sys" light flashes, the server will return to the factory settings. You can make the correct settings again on the server.
Thank you.
- 1


 daok_roy@foxmail.com
 Facebook
 Youtube
 Twitter